Jay Fisher - Fine Custom Knives
New to the website? Start Here
"Cassiopeia"
I've included this page because of several reasons. One is to keep and save an archive for the clients who have these components that I've made for so many years. If a client has a pre-2000 knife of mine, he may very well have this accessory on his kit, and might want to know about it.
This is also an archival website, and it's good to see how things progress. You can see how the belt loop extender got started, how it was initially made, and how it evolved into the newest model. Please don't use this page's illustrations and directions for newer accessories, this is the old stuff.
Here, then, is the early description, and the early photos one of my earliest accessories for my tactical knife sheaths.
Purpose: though my locking knife sheaths usually offer a variety of wear options, sometimes the knife user wants a more traditional, lower orientation of the knife at the waist, with the handle in a lower position. This accessory allows the knife sheath to be worn with the knife handle approximately even with the center of the belt line, much lower than with the standard aluminum belt loop mounts. The length of the extender can be set on an individual basis, but are not adjustable as the length is permanently stitched into the accessory. The extender is custom created for each knife, and because of the differences in each knife sheath, they are usually not interchangeable with other sheaths, even my own. It is a custom piece.
Please remember that this is only the Basic model. Below are some pictures of how the basic extender is attached to the tactical combat knife sheath.
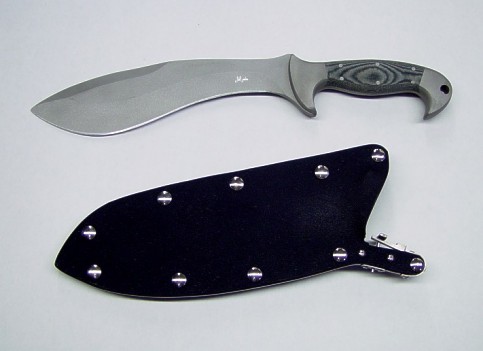
This is the typical combat knife that might use this type of accessory. The knife is a combat tactical Horrocks model, in bead-blasted stainless tool steel, with stainless steel bolsters and bead-blasted canvas reinforced Micarta® phenolic handle secured with stainless steel pins. The sheath is one of my locking combat waterproof models, with double-thick kydex over a 5052H32 corrosion resistant, high strength aluminum welt frame. The sheath is secured with nickel plated steel Chicago screws, and has an all-stainless locking mechanism with stainless steel hardware and spring. Read more about these fine sheaths on a special page here.
In the following illustrations, I'll demonstrate how the sheath mounted belt loop extender is attached to the sheath.
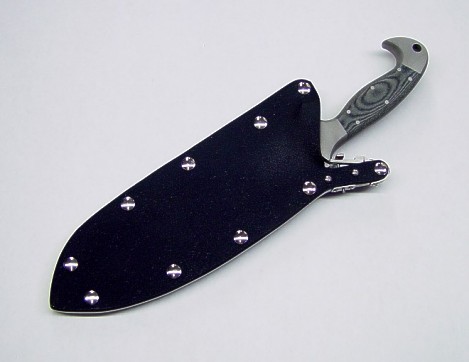
Here is the knife locked into the sheath. The handle is exposed for quick access, and you can see the lock mechanism is also exposed for the thumb to release it. This is the sheath front for typical right side wear, but the sheath can be reversed by simply mounting the belt loops on this side. In my newer sheaths, the die-formed high strength aluminum belt loops can also be repositioned in some of the lower sets of holes, so the knife sheath can be worn in an inverted position. Each knife varies, and these individual options are detailed on the knife's specification, photo, and description page.
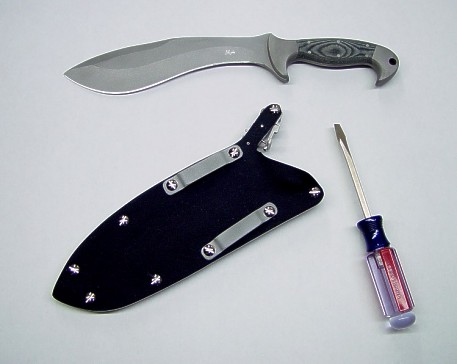
To mount the extender, you'll need a flat blade screwdriver. The sheath is turned over here so you can see the slotted screw heads of the Chicago screws.
Important note: do not remove the top screw that is integral with the locking mechanism. Parts of the mechanism are assembled under tension and can not be removed. Removing the screws securing the belt loops is no problem and that is what you'll be doing next.
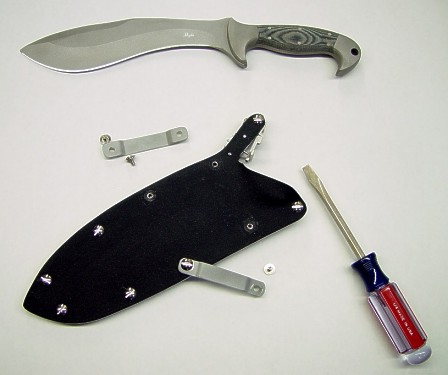
Here the Chicago male screws and aluminum belt loops are being removed. Do not worry about orientation or individual placement of the belt loops. Unless you have an older model of my locking sheath (before 2003), these aluminum belt loops are interchangeable on each individual sheath. It's important to note that only the male part (screw) of the Chicago screw goes through the belt loop, and not the female part (the nut). The male screw allows some movement and adjustment of the belt loops.
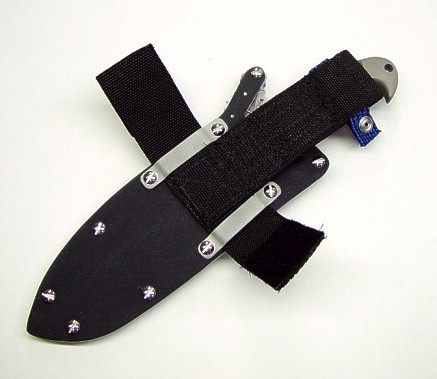
The sheath extender is placed under the aluminum belt loops and the screws are reattached. The screws do not need to be super tight, save your he-man strength for combat. Good and snug is all that is necessary. You might wonder why you had to remove the aluminum belt loops at all. Why not just thread the arms of the extender through the loops? Because of the thickness, size, toughness, and industrial strength Velcro (hook and loop) pads, you can't do this; there simply is not enough room. In fact, the extender can not be removed once the belt loop screws are tightened.
This is one of the custom measures that allows the extender only to be used on the individual knife sheath. The tolerances are very tight. The extender is placed so the anti-flop elastic shock cord (also called bungee or ockky strap) is wrapped and snapped around the knife handle. The shock cord in this photo is blue.
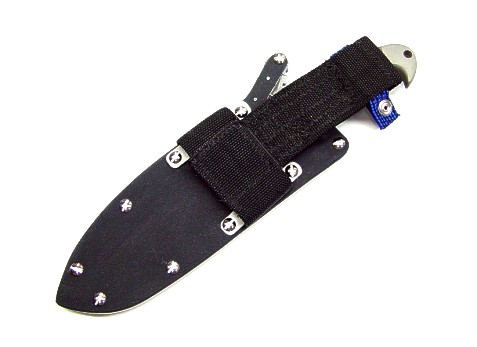
The Velcro pads are now closed over each other to fully secure the extender to the sheath. The strength of the extender does not rely upon the Velcro, the Velcro is there as an additional fastening agent for security. It also pads the back of the sheath extender where it might ride against the body.
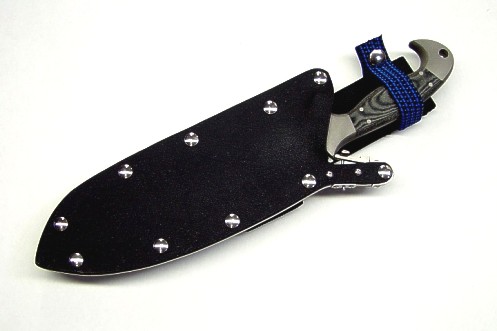
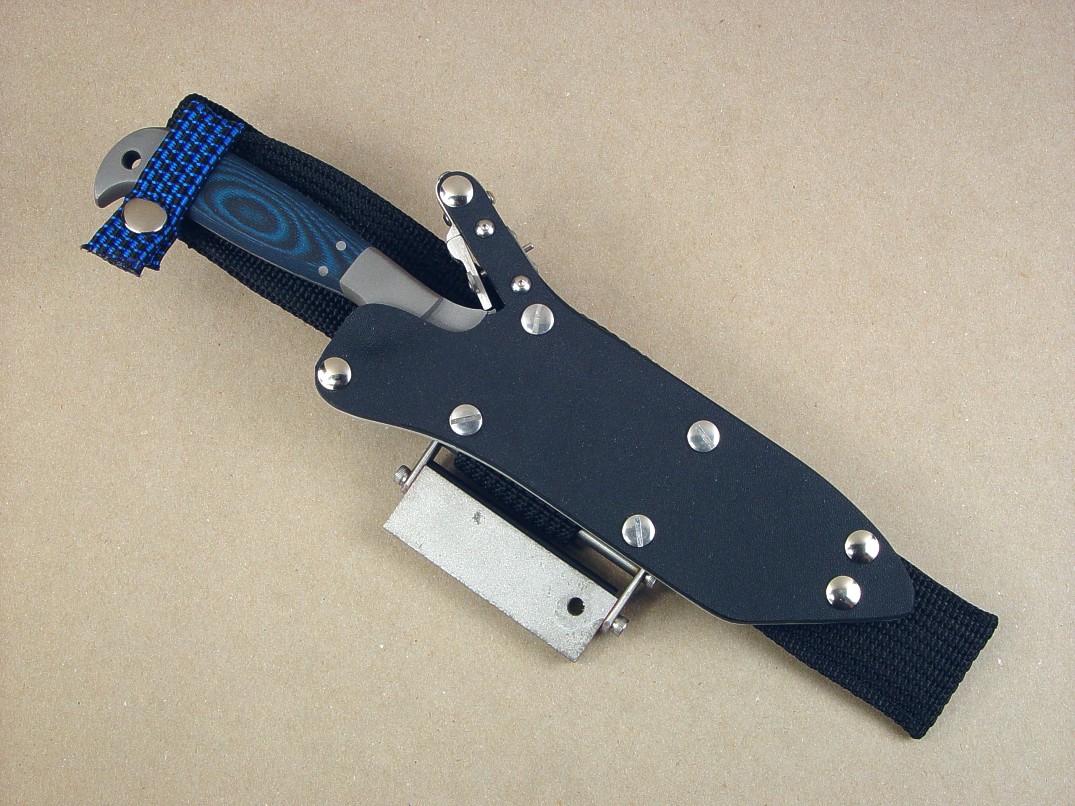
The polypropylene/nylon/shock cord extender ready for wear. The blue shock cord is flat and strong, and is secured through and independent sewn tube in the upper end of the extender's belt loop. It's held there by tension and because it has nickel plated steel snaps on the ends that will not easily slide out. This allows the shock cord to be removed if desired, or replaced if worn or deteriorated.
The purpose of the shock cord (also called bungee, elastic cord, or ockky strap) is to keep the handle from flopping around away from the body when the wearer is active. It is not a security measure to assist or replace the stainless steel locking mechanism on the knife sheath.
The photo set below illustrates how my locking sheath belt loop extenders are worn and used.
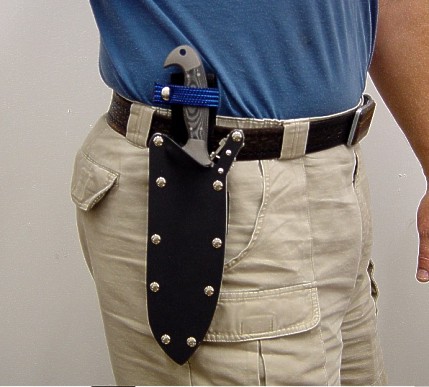
Here's a typical wearing style for the sheath extender and tactical knife, right side, blade back. Note how much lower the extender sets the handle than the aluminum belt loops. The handle is nearer to the belt line, rather than high by the ribs. The extender should not be too long, or the lower tip of the sheath will flop around and need to be secured to the thigh.
Currently, I do not make thigh straps, as they may interfere with movement in the field. Also, a couple guys have asked if I could make the height adjustable. I think this is a bad idea, as that would weaken the whole vertical riser on the extender. I'd have to use something like Velcro, which could cause critical noise if the knife sheath is tugged, caught, or trapped. If the adjustment was made with metal fittings, this would concentrate the tension on the point of the metal fasteners, and they would wear. We've all seen many rivets and grommets fail this way on military webbing belts. Metal could also rub and abrade the clothes and gear beneath it, against the wearer. I also wanted the extender to be as strong as the aluminum loops and the locking mechanism. Adding adjustable height to the arrangement would weaken it.
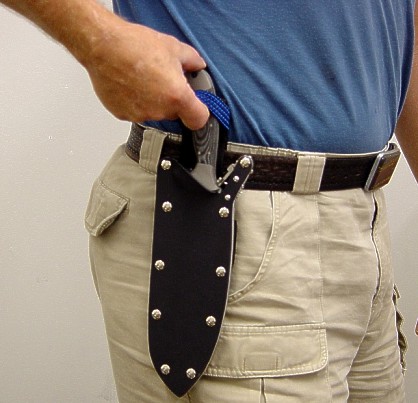
Here's how to remove the anti-flop shock cord. A simple pull and the cord is pulled over the top of the rear bolster. A lanyard should not be used when the knife is worn this way, it may interfere with the shock cord. Another way to remove the shock cord would be to unsnap the nickel plated steel snap at the rear of the shock cord. The color of the shock cord is a visual aid that helps the wearer to assure the handle is secured against the extender. Remember, even with the shock cord removed, the knife is still secure in the sheath. Even with the shock cord snap unsnapped, the shock cord can not be removed from the tube without tremendous effort. It's flat and tight. Round shock cord would not work here.
Notice also that the snap is oriented to the back of the knife handle. This can prevent the shock cord from hanging up and snagging in brush, or close areas. If the sheath and extender were reversed, the shock cord and snaps can be pushed through the sewn pocket at the top of the extender, and mounted in reverse, keeping the correct orientation for left side wear.
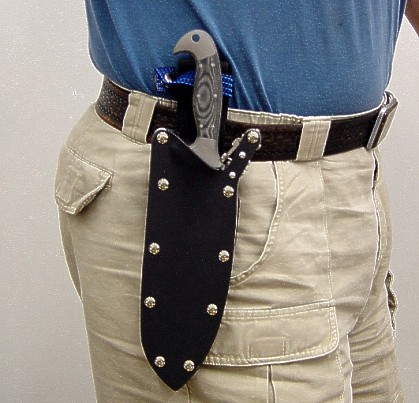
The anti-flop elastic shock cord snaps out of the way of the handle after it is released. This is important since retaining straps on sheaths frequently get in the way of the knife blade when removing and inserting the knife from the sheath. This is a sore spot with most knife wearers, and on my Sheaths and Combat Knives page, I state that snap/loop retention of knife handles should be outlawed. The knife blade will eventually contact and cut through this kind of sheath strap. With my arrangement and use of this type of shock cord, that won't happen.
Remember, the shock cord is not used to retain the knife in the sheath, the stainless steel locking mechanism is. The elastic is pulled tightly out of the way of the knife handle and blade, and is snug against the belt loop extender, staying out of the way of the hand and blade.
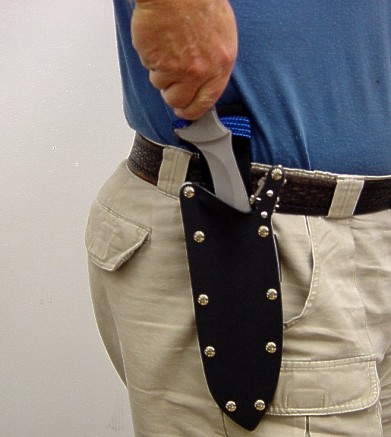
With the anti-flop shock cord out of the way, the knife is easily unlocked with the thumb and removed from the sheath. Here's where the stiffness of the polypropylene and the multiple layers and heavy stitching reinforce the extender. When you pull up on the knife, a weaker, thinner extender would buckle, allowing the sheath to flop outward away from the body. In military style pistol loop extenders, sometimes a piece of plastic or aluminum is sewn into the layers to stiffen them. For my extender, I did not want to hassle with metal or plastic, I wanted the entire extender to be tough yet comfortable as well as allowing the textiles to breathe and thus dry out if wet. The double layers and the multiple cross triple zigzag stitching stiffens the entire vertical length. The extender is light, simple, and comfortable to wear.
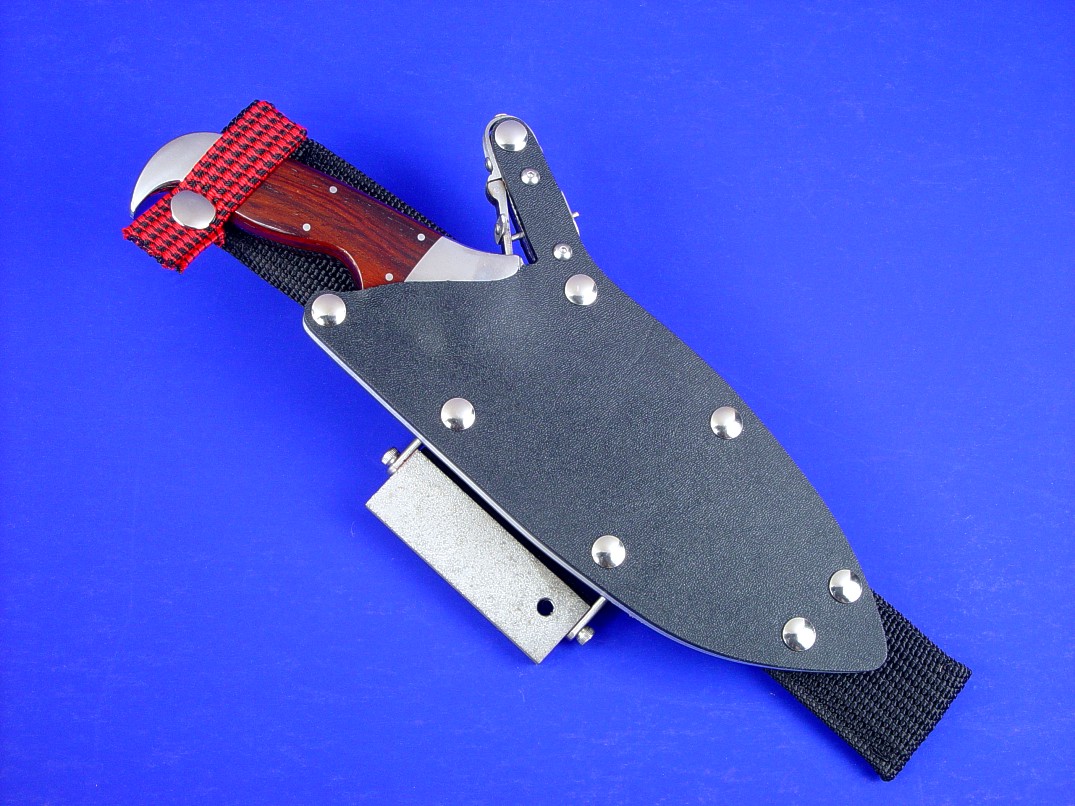
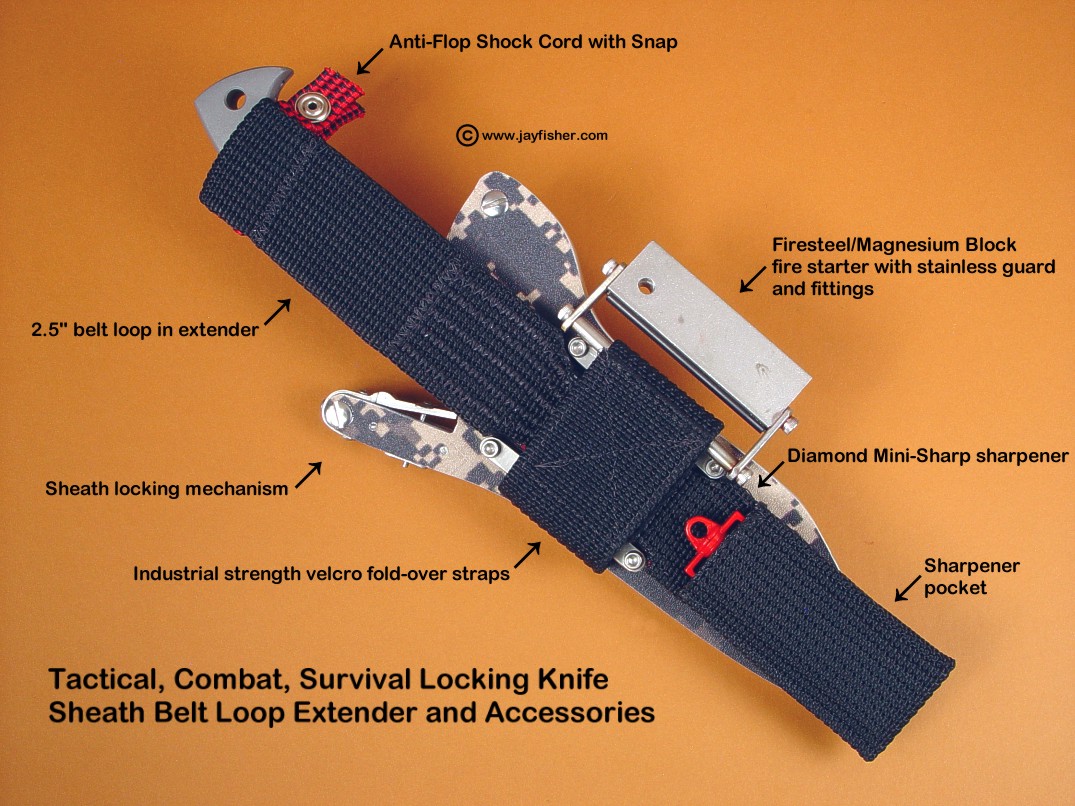
The ultimate tactical, combat, and survival knife sheath belt loop extender is designed and functions like the basic belt loop extender above, but with some important added features and devices. The extender is mounted by replacing the aluminum die-formed belt loops with heavy, counter-bored 304 stainless steel bars and 18-8 stainless steel machine screws. This gives the accessory more room for the Firesteel/Magnesium block fitting at the industrial strength Velcro fold-over pads. Additionally, there is a special dedicated pocket at the extender's bottom to secure a DMT Mini-Sharp diamond abrasive hone. These accessories are described in the sections below. Here's how the ultimate is mounted:
Be certain to lay the sheath on a non scratch surface to protect the dyed image and sheath front from scratches.
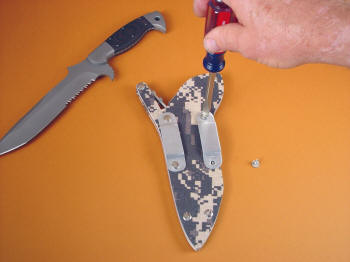
To convert the sheath from its standard die formed aluminum belt loop configuration, use a flat blade screwdriver to remove the existing stainless steel Chicago screws and belt loops. Be careful at all times to not scratch or gouge the surface dye of the digital image on the kydex sheath if so equipped. Leave the female (nut) portions of the Chicago screws in place.
Please click on thumbnail photo at left for larger image or more detail.
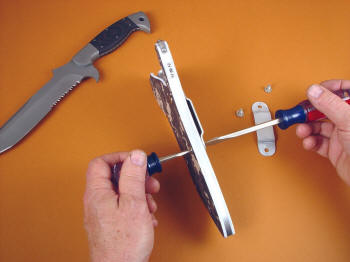
Ordinarily, most Chicago screws have only a plain domed head on the female component (the nut). But in these special solid 304 stainless steel Chicago screws, I've modified them for a slot on both sides. This allows more pressure to be applied in both loosening and tightening the Chicago screw. Be very careful if you have to do this, the screwdriver can slip and mar or gouge the finish of dye surface of the kydex.
Please click on thumbnail photo at left for larger image or more detail.
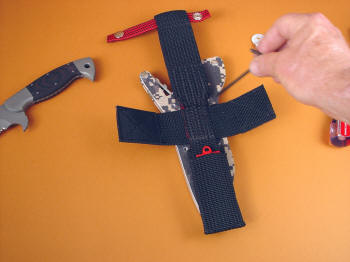
The knife sheath belt loop extender accessory is positioned at the sheath back. In the photo, the allen wrench (or hex key) is pointing to the cut-outs along side the vertical length of the extender webbing where the Chicago screws are located on the sheath back. The extender must be positioned so these areas are clear. Be sure to position the extender with the pocket containing the DMT MiniSharp sharpener up, and not against the sheath. The photo set shows the positions of the sheath and extender for right side wear. For left side wear, the Chicago screws are reversed, and the sheath flipped over. The red shock cord with snap at the top of the extender would have to be reversed also.
Please click on thumbnail photo at left for larger image or more detail.
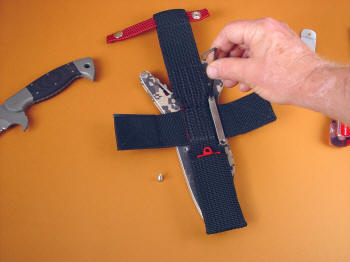
For this accessory, I've included special mounting bars made in brush-finished 304 stainless steel. These bars fit only the sheath that they were designed for, and allow a tight and very secure mounting with absolute corrosion resistance. The bars have counter-bored sockets for the socket head cap screws, so be sure those are oriented to accept the screw heads (refer to photo). These machine screws are also 304 stainless steel, so the entire assembly is highly corrosion resistant. The bars are placed alongside the vertical webbing, and you can see the cut-out areas where the screws will clear the webbing. Leave the socket head cap screws loose until all are started and you are sure of the position of the webbing. The 9/64" allen wrench (or hex key) is included.
Please click on thumbnail photo at left for larger image or more detail.
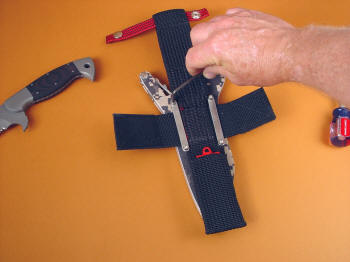
Use the included 9/64" allen wrench to tighten the socket head cap screws evenly. Do not over-tighten; because these are all stainless steel, it would be easy to apply too much pressure and deform the aluminum welt frame of the sheath. A few tugs of the webbing of the extender and you can see how solid it all is. If you've over-tightened, the knife can also bind in the sheath.
Please click on thumbnail photo at left for larger image or more detail.
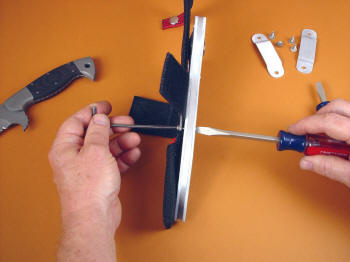
Sometimes, the Chicago screw female component will slip, and you can hold it with the flat blade screwdriver. As mentioned before, be very careful and do not let the screwdriver slip or it can gouge the kydex.
Please click on thumbnail photo at left for larger image or more detail.
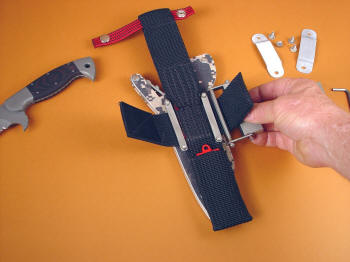
The fire starter can be mounted to either side of the webbing, and the industrial strength Velcro padding holds it against the stainless steel bars you just mounted. It can swivel around a bit, allowing more comfortable positions, but it does not rotate in its own frame. This is a safety feature I've described below. The fire starter can also be mounted on just about any fixture or fitting, or anywhere along the belt loop or utility straps.
Please click on thumbnail photo at left for larger image or more detail.
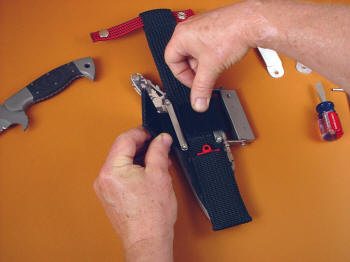
Pull the Velcro hard against the rod of the fire starter, and fold over to lock.
Please click on thumbnail photo at left for larger image or more detail.
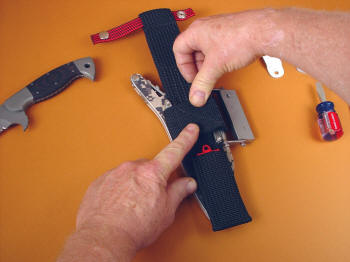
The Velcro holds the webbing in place, the webbing secures the firestarter. Just as in the basic locking sheath belt loop extender detailed above, the Velcro is not mechanically needed to secure the extender to the sheath, the stainless steel bars do that. It does help to pad the sheath back, secure the fire starter, and lock in the diamond sharpener.
Please click on thumbnail photo at left for larger image or more detail.
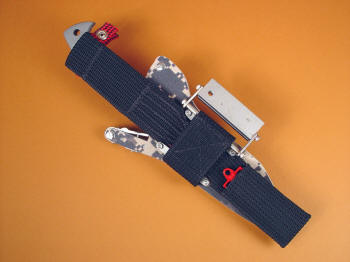
To the left is what the assembly looks like completed. Note how the velcro closure will prevent the DMT Mini-Sharp sharpener from coming up and out of its pocket. The added padding also helps keep the sharpener head and the fire starter away from the body.
Please click on thumbnail photo at left for larger image or more detail.
| Main | Purchase | Tactical | Specific Types | Technical | More |
| Home Page | Where's My Knife, Jay? | Current Tactical Knives for Sale | The Awe of the Blade | Knife Patterns | My Photography |
| Website Overview | Current Knives for Sale | Tactical, Combat Knife Portal | Museum Pieces | Knife Pattern Alphabetic List | Photographic Services |
| My Mission | Current Tactical Knives for Sale | All Tactical, Combat Knives | Investment, Collector's Knives | Copyright and Knives | Photographic Images |
| The Finest Knives and You | Current Chef's Knives for Sale | Counterterrorism Knives | Daggers | Knife Anatomy | |
| Featured Knives: Page One | Pre-Order Knives in Progress | Professional, Military Commemoratives | Swords | Custom Knives | |
| Featured Knives: Page Two | USAF Pararescue Knives | Folding Knives | Modern Knifemaking Technology | My Writing | |
| Featured Knives: Page Three | My Knife Prices | USAF Pararescue "PJ- Light" | Chef's Knives | Factory vs. Handmade Knives | First Novel |
| Featured Knives: Older/Early | How To Order | Khukris: Combat, Survival, Art | Food Safety, Kitchen, Chef's Knives | Six Distinctions of Fine Knives | Second Novel |
| Email Jay Fisher | Purchase Finished Knives | Serrations | Hunting Knives | Knife Styles | Knife Book |
| Contact, Locate Jay Fisher | Order Custom Knives | Grip Styles, Hand Sizing | Working Knives | Jay's Internet Stats | |
| FAQs | Knife Sales Policy | Concealed Carry and Knives | Khukris | The 3000th Term | Videos |
| Current, Recent Works, Events | Bank Transfers | Military Knife Care | Skeletonized Knives | Best Knife Information and Learning About Knives | |
| Client's News and Info | Custom Knife Design Fee | The Best Combat Locking Sheath | Serrations | Cities of the Knife | Links |
| Who Is Jay Fisher? | Delivery Times | Knife Sheaths | Knife Maker's Marks | ||
| Testimonials, Letters and Emails | My Shipping Method | Knife Stands and Cases | How to Care for Custom Knives | Site Table of Contents | |
| Top 22 Reasons to Buy | Business of Knifemaking | Tactical Knife Sheath Accessories | Handles, Bolsters, Guards | Knife Making Instruction | |
| My Knifemaking History | Professional Knife Consultant | Loops, Plates, Straps | Knife Handles: Gemstone | Larger Monitors and Knife Photos | |
| What I Do And Don't Do | Belt Loop Extenders-UBLX, EXBLX | Gemstone Alphabetic List | New Materials | ||
| CD ROM Archive | Independent Lamp Accessory-LIMA | Knife Handles: Woods | Knife Shop/Studio, Page 1 | ||
| Publications, Publicity | Universal Main Lamp Holder-HULA | Knife Handles: Horn, Bone, Ivory | Knife Shop/Studio, Page 2 | ||
| My Curriculum Vitae | Sternum Harness | Knife Handles: Manmade Materials | |||
| Funny Letters and Emails, Pg. 1 | Blades and Steels | Sharpeners, Lanyards | Knife Embellishment | ||
| Funny Letters and Emails, Pg. 2 | Blades | Bags, Cases, Duffles, Gear | |||
| Funny Letters and Emails, Pg. 3 | Knife Blade Testing | Modular Sheath Systems | |||
| Funny Letters and Emails, Pg. 4 | 440C: A Love/Hate Affair | PSD Principle Security Detail Sheaths | |||
| Funny Letters and Emails, Pg. 5 | ATS-34: Chrome/Moly Tough | ||||
| Funny Letters and Emails, Pg. 6 | D2: Wear Resistance King | ||||
| Funny Letters and Emails, Pg. 7 | O1: Oil Hardened Blued Beauty | ||||
| The Curious Case of the "Sandia" |
Elasticity, Stiffness, Stress, and Strain in Knife Blades |
||||
| The Sword, the Veil, the Legend |
Heat Treating and Cryogenic Processing of Knife Blade Steels |